Home About Me Free Tutorials My Portfolio Categories Archives Contact Me
Showing posts with label TUTORIAL. Show all posts

Thursday, March 3

Thursday Tutorial: Titles

Artist's Block Conquered with Today's Trends in Titles & Word Art
by Julie Ann Shahin
originally printed in Flourish, newsletter for MyScrapbookArt.com

Computer eye strain, hundreds of photos, and eager family members, awaiting your next masterpiece, make up your current dilemma. You sit in front of your monitor, as the queen of digiland, staring down the blank page yet feeling mildly inspired.

Flipping through design books, wandering among street art, checking out the latest releases in the music store for album art, googling for the latest and greatest ideas is where you find yourself. You listen to Pandora.com hoping your favorite artist's tunes will stimulate your senses. You've found an excellent color scheme at Kuler.Adobe.com.  What you need is that perfect title and word art to deliver that "aha!" moment you've been seeking.

Think cursive hand-written titles mixed with arial fonts, quirky alphas made up from typography, and word art and frame clusters among vivid paint strokes. Take inspiration from recent graphic uploads at deviantart.com. Now you have your masterpiece. Now you are a trend-setter.

Trends In Word Art Today: Products


Inspiration #1) Rotate Text
Inspirational Typo Poster from Deviant Art http://palax.deviantart.com/art/061-121839414


and also inspirational playbill from Deviant Art http://camaeralucida.deviantart.com/art/MammaMia-121616219


From the two graphics above, I was inspired to make this layout to symbolize my husband's passion for music and my enjoyment of it.
Credits: Layout by Julie Ann Shahin
Background: retrogirl_by_lookbutdontouch at deviantart
Font: The King & Queen
Word Art: Magical Words Overlay 2 by Kitty Designs; TaylorMade Spotlight Bundle Kit by TaylorMade Designs
Other digital elements: Project 365 Word Snips by DeCrow Designs; Whimsical Woodland by Emily Merritt, Rachel Young and Jaime Young; Inked overlay by Janet Crowley


Inspiration #2) Handwritten draft-style font in different pt sizes
http://arhcamtilnaad.deviantart.com/art/A-Hug-121708108


and the resulting layout

Credits: Layout by Julie Ann Shahin
A is For Amazement by Kathryn Wilson
Sea Creatures by Emily Merritt
Picnic in the Park Collab at wearestorytellers
Happy Together by Emily Merritt
Rough Draft Font
Background from deviant art:textures by youshinevh


Inspiration #3) Type created from typeDigital art http://honeysand.deviantart.com/art/Feeling-Good-122112730

and also view this inspiring page titled "type invert" which is viewable here .

My resulting layout will be a RAK for a friend. Each letter of "mother" is made up of tiny type, available as a brush and alpha.
Credits: Layout by Julie Ann Shahin
Brush N Stamp Alpha: Lettered by Leiko Beck Designs
Mother sign from deviant art: http://deviant-brazilian-fc.deviantart.com/art/Mother-sign-by-pryestrela-122101705
World of My Own by Emily Merritt
Funky Love Song by Emily Powers
TaylorMade Spotlight Bundle Kit by TaylorMade Designs


Inspiration #4) Chunky Hand-written Alpha, Cursive Handwriting Mixed with Arial Font


Credits: Layout by Julie Ann Shahin
TaylorMade Spotlight Bundle Kit by TaylorMade Designs
A is For Amazement by Kathryn Wilson
Intrinsic by Kathryn Wilson
Wishes and Wonder by Kathryn Wilson and Traci Reed
Embellishous by Kathryn Wilson
Background: retro textures by ~awesomestyle http://awesomestyle.deviantart.com/art/4-retro-textures-121317560


Inspiration #5) Word Art with Frame and Vivid Paint

Credits: Layout by Julie Ann Shahin
Express Yourself Quotes by beAUDacious Designs
It's A Date Word Art by beAudacious Designs
Life's A Circus Distressed Papers by Angela Woo
Vintage Embroidery Vol. 1 by Spotted Dog Designs
Picnic in the Park Collab by wearestorytellers
Forecast by Emily Merritt
Background: Large textures by ~Lookbutdontouch http://lookbutdontouch.deviantart.com/art/3-large-textures-121654414


Hope you enjoyed these inspirational title ideas!
Julie Ann Shahin


Enjoy This Post?

Subscribe to My Blog with Google or with or with Bloglines


Photobucket

Thursday, February 24

Thursday Tutorial: Creating the Perfect Background - Hybrid Style

Creating The Perfect Background
Instructions by Julie Ann Shahin
Originally appeared on the Authentic Artistry Blog

Although I prefer to let other people design papers, I do have a few tricks up my sleeve for designing a background. In fact, I absolutely love incorporating authentic vintage music paper in my work so this is something that you could use as a hybrid background or a digital background. I find my vintage music paper at local antique co-ops.  Maybe you'll Goodwill store might have some, or at least vintage books that you can take pages out once you get the book home.

The other item you will need are brushes of vintage images. If you are making this for commercial purposes, you'll need to make your own brushes or you can find brushes that have commercial licenses. I like seeing what is new at the site Brusheezy. Brusheezy lets you download brushes for free or you have the option of making a Paypal donation. Always be sure to read the Terms of Use that comes with your downloaded file. For my background, I'll be using the 1940 Cosmopolitan Ads brushes.


Instructions for Vintage Background: (to be completed after the brushes are installed)
1. Once your software program is open, select a color for your background. (I use Photoshop Elements).
2. Open in your software program a new document size 12" x 12" with Transparent chosen for the background contents, 300 dpi. It must be transparent or the following steps will not work for our desired result.
3. Fill the layer with your selected hue from Step 1.
4. Now chose the Eraser tool. From the drop-down box in your tool bar, load the 1940 Cosmo Ad brushes.
5. Select various brushes and click them on your background. This will leave the area erased away.
6. If you wish to do some further distressing, play with some of your default brushes such as natural brushes or faux finish.
7. Now you are ready to print this design onto your vintage music paper. Trim your physical paper to a size that will fit in your printer. Be sure to re-size your digital image so that it will fit onto your physical paper as well.
8. Print directly onto the vintage music paper, with Best Photo selected and the proper printer settings. I used the Plain Paper setting.
9. My finishing touch was to add a machine-stitched zig-zag border along the edges.
10. To use your new paper, you can use it for a hybrid layout or scan it to use as a digital background.

Background by Julie Ann Shahin


*************************************
Layout Example by Julie Ann Shahin
{Credits below}
Credits: (CRD = Christina Reneed Designs)
Background paper: Julie Ann Shahin
Tag: Authentic Artistry ATC Freebie-Sherrie
Arrow: CRD Just for Fun Doodles
Swirl: CRD Just Plain Ole Swirls
Ribbon & buttons: CRD Ribbon Fasteners
Stitched leaf: CRD Urban Stems
Ribbon heart: CRD French Countryside Collection
Frame: CRD Ultimate Art Collection
Alpha: CRD Graffiti Alpha Brushes
Flowers, leaf: CRD Build-A-Bloom Collection


Enjoy This Post?

Subscribe to My Blog with Google or with or with Bloglines



Photobucket

Sunday, February 20

DIY HomeMade Clip It Up

ETA: March 21, 2011 Happy First Day of Spring!!!! Welcome Scrapscene Readers!!! Please note I have moved my blog to http://julieannshahin2.blogspot.com and this post is also moved, now found at this link.You can also view a welcome message at my new blog here. I hope you'll follow me there.

Clip It Up Wall Mount Organizer
Clip It Up Wall Mount Organizer by Simply Renee
I am in the midst of re-organizing my scraproom. I decided I wanted to make my own Clip It Up Wall Mount Organizer, and I'm sharing with you today my finished results. I deliberately didn't take pictures of my worksurface because it's a mess, as I'm sorting through the rest of my scraproom!

I had saved the clear wrappers from scrapbook orders and purchases for years, and that is what I used to put most of the items in. I have on my new Wall Mount Organizer: flowers, felt goodies, bling, stickers, rubons, and ribbon. (see full-length photo below)

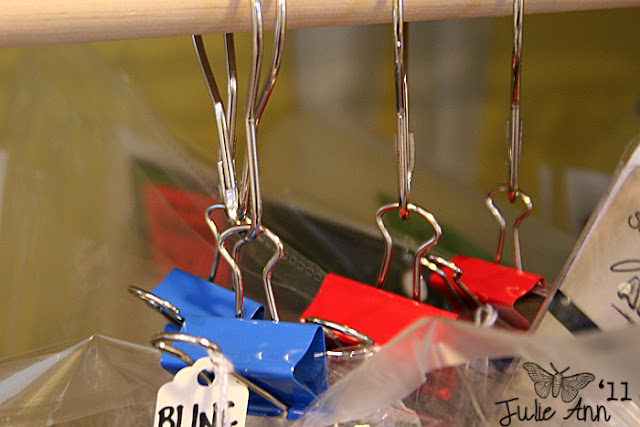
The details: My husband installed this for me with his power tools, an electic screwdriver, I mean. It cost under $30 for two wood dowels (Walmart), 4 brackets (Walmart), screws and wall anchors (stash), shower curtain hangers (Home Depot), and binder clips (Dollar Store). The length overall is about 68", or it could have been 72" as each dowel was 36" in length but I only had room for 68".  The same length from Simply Renee would have cost about $75. A savings of $45!


View of the bracket attached to the dowel, using small screws


View of the Shower Curtain Rings and Binder Clips

I had some clear organizers from a binder that I used for flowers.

View of the entire length, fits between wall and window


Here are some other homemade Clip It Up's links, a few tutorials too:

Plus!
Simply Renee Clip It Up Rotating Craft-Storage Base Rack with 80 Swivel Clips
Simply Renee Clip It Up Rotationg Organizer Base Rack with 80 Swivel Clips

I don't think I have room for this in my room, but I wanted to share links to Homemade Clip It Up Tabletop Spinner links:
If you have a great organization tip, or have a comment about Clip It Up, please share!!! Now back to my scraproom to finish my re-organization project! :)


Enjoy This Post?

Subscribe to My Blog with Google or with or with Bloglines


Photobucket

Friday, February 18

As Seen On the GingerScrapsStreet Blog - A Tutorial

How to Recycle and Alter Your Valentine Candy Boxes in 8 Steps!

Hi, it's Julie Ann bringing you a tutorial today on How to Recycle and Alter Your Valentine Candy Boxes! It's easy and fun, and good for the environment too!!! This appeared on the Scrapstreet Blog on Valentine's Day. These are inspired by Lisa Kettell.


SUPPLIES
To start, you need a few supplies:
  • heart-shaped candy box
  • liquid adhesive (I used gel matte medium, and I also really love Fabri-Tac by Beacon)
  • pop-dots adhesive
  • digi printables- vintage valentines vignettes: I Heart You by Tangie Baxter (Scrapbookgraphics)
  • pen or pencil (for tracing)
  • scissors (one with fine tip is preferable)
  • vintage music paper or patterned paper of your choice
  • crepe paper aka streamers
  • flowers
  • wing and jewel (Prima Marketing, Inc) *optional
  • glitter
  • silver pipe cleaner or garland
  • ribbon
  • hole puncher or Crop-A-Dile

TUTORIAL


1. Trace on wrong side of music sheet paper or patterned paper around the heart, and cut out. Adhere to the top of the heart lid.
2. Add adhesive around the edges of  the heart on the paper.

3. Gather and scrunch/pinch the crepe paper together as you adhere it to the edges of the heart. Go all the way around the heart in this manner.

4. Adhere silver pipe cleaner or silver garland in a heart shape over the edges of the crepe paper where it meets the music paper. I find Fabri-Tac adhesive works best.
5. Sprinkle vintage glass glitter over the project and it will adhere to the glue left over from the pipe cleaner.

6. Adhere the three cut-out digi printable hearts, overlapping, as shown above, using pop-dots for dimension.

7. Embellish with flowers, a wing on the angel, and a jewel at the bottom tip of the heart.

8. I punched two holes, one on each side, of the candy box - with my Crop-a-Dile (or you can use a hole puncher). Pull ribbon through and tie a knot. It's now ready for hanging when you put both sides of the candy box together!
And here are a few others I've made this year for additional inspiration..........


Enjoy This Post?

Subscribe to My Blog with Google or with or with Bloglines


Photobucket

Tuesday, February 15

Counterfeit Kit Blog Challenge and Tutorial Links

I heard about the Counterfeit Kit Challenge on 2peas when they announced their DT Call. I'm too busy to apply, though highly tempted! I love the whole idea (and created my own Counterfeit that is below), which they explain as posted on their blog...

If you have ever browsed through those great monthly scrapbook kit clubs and admired their beautiful kits...but knew you needed more supplies, like a "hole in the head"...you know who you are (you're the one with TONS of supplies and embellishments in your ever growing scrapbook stash)...this challenge is for you!

On the 5th of every month here at the Counterfeit Kit Challenge Blog, we will choose a kit from a popular kit club (for inspiration) and challenge you to create a "counterfeit kit", using just the supplies you already own. And to be fair, just in case you
need the "inspiration" kit, we will only feature current club kits, because we're nice like that!

In addition to our "counterfeit" challenge, we will also include a few other challenges (to actually USE these kits), a few tutorials (for creating your own embellishments), and a blog hop (toward the end of the month for everyone to SHARE their "counterfeit kits" and their creations)!


We
challenge you to jump right in, join us, be inspired, create, and share your work! We can't wait to meet you!
The Challenge
Their February Challenge is to Counterfeit the Scraps of Darkness kit as pictured here:
Link: http://www.scrapsofdarkness.com/images/Feb_Main_Kit_Embellishments.jpg

The CHALLENGE is to use this kit for inspiration. How, you ask? Well, there are many ways to go about this. Here are a few ideas...

  • Try and match every piece in this kit as close as possible to something from your supply stash.
  • Use the "kit contents" as inspiration, and recreate your own kit with the same types of supplies, but in a different color or style that corresponds better with your preferences/photographs/scrapbook style/tastes.
  • Make a "page kit" rather than a large kit..."counterfeiting" just a few items from this kit as inspiration. 
  • Using the color scheme from this kit as inspiration, try to re-create a kit of your own using whatever supplies you have available.
  • We hope you all find some inspiration in the kit we choose this month!!!  If you aren't sure where to begin, check out the "Hints and Tips" page of our blog for some help.  
Tutorials
Some of the items in this month's kit, were similar to some tutorials from last month...check out these tutorials to get you started...Embellished Straight Pins and Bingo Cards.  Have fun getting started!!!
Photo source
Photo source

ADDITIONAL TUTORIALS (not created by me, see authors at link location)


My Take On the Challenge

Here is my Main Kit, it's my first time and since I'm re-arranging and re-sorting through my scraproom, I took a really quick and haphazard photo.

This is my Vintage Add-On Kit, I couldn't resist adding in some Valentines.


I've made several projects so far. A layout inspired by the Big Picture Class "Embrace Imperfection"...

Oh yeah, see that white strip of paper that's been embossed? I just used my new Sizzix BigKick!!!!


Enjoy This Post? 
Subscribe to My Blog with 
Google or with or with Bloglines 
 
Photobucket